- Communication Between Contiki Mote and Computer
- Access Contiki Motes via Serial Communication
- Contiki Shell Method
- Customizing Contiki Shell
Serial communication can be defined as a process used to send and receive a bit at a time sequentially. Sometimes serial communication is called UART (Universal Asynchronous Receiver/Transmitter). Technically, we already used serial communication when we uploaded Contiki-NG programs to WSN motes. We also communicate with WSN motes via the printf() function. Then, we listen to the messages from printf() using the command make login.
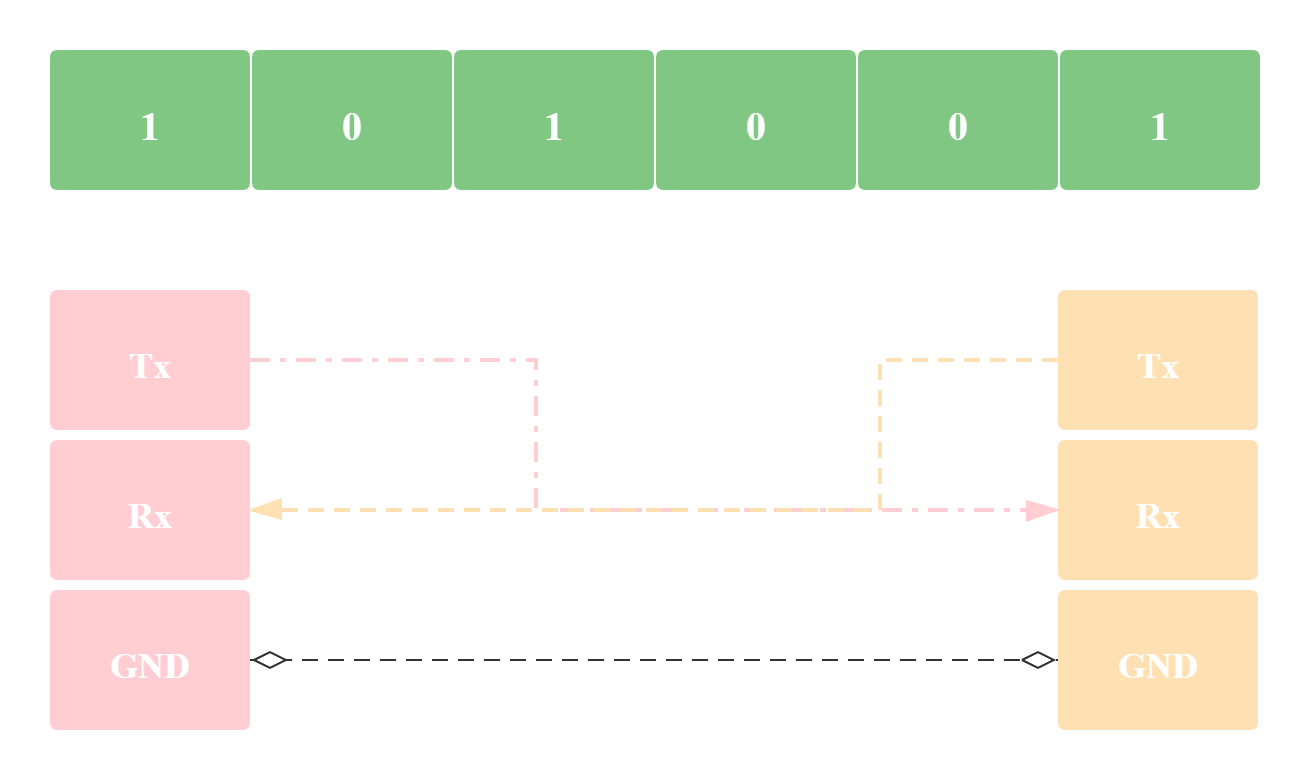
In hardware implementation, a serial communication needs at least three pin outs. These are Rx (Receiver), Tx (Transmitter), and GND (Ground) pins.
Communication Between Contiki Mote and Computer
This method is useful because we can control our Contiki motes from the computer. Running applications on a computer has benefits, such as interacting with the database server and communicating with the cloud server.
There are a lot of methods used to communicate between a computer and a Contiki mote. We will focus on two methods: serial communication and shell.
Access Contiki Motes via Serial Communication
Since our WSN motes are attached to the computer through serial communication, we can initiate communication between the computer and a WSN mote. Some application platforms, such as C/C++, Java, Python, C#, and Node.js, provide libraries with which to implement serial communication.\
Here, we will try to access WSN motes using Python through serial communication. To implement serial communication in Python, we use the pyserial library, which can be found in Pyserial. This library can be installed using pip (in Ubuntu 20.04, using Anaconda, then initialize a new environment and install the library by conda install pyserial).

We can verify if our computer has installed pip or not. We can type this command in Terminal:
1 | which pip |
If we don’t get a response, it means our computer is missing the pip program. We can install pip using this command in Terminal:
1 | sudo apt-get install python-pip |
In Ubuntu 20.04, use conda install pip. Make sure our computer is connected to the Internet. Next, we must write a Python program to listen for incoming messages on a specific serial port. We should know which serial port is used by the Contiki mote. We need it because we will use it on our program. To find a serial port from the Contiki mote, we can open Terminal and type this command:
1 | ls /dev/tty* |
We should see a list of connected serial ports available on our computer. Depending on our Contiki mote model, we can verify the port by turning the mote on/off so we should which a new attached serial port. For instance, my Contiki mote is detected as /dev/ttyUSB0.
Now, we will develop the Python program. We will print all incoming data from the serial port to the console. Set the baud rate to 115200 for the serial-port speed. Create a file, called contiki-viewer.py, and write these complete scripts. Change the PORT value to that for our Contiki-NG mote:
1 | import serial |
Contiki Shell Method
Contiki OS provides a shell API that we can utilize to communicate with internal Contiki-NG motes. We find the shell API in the Contiki source code in <Contiki-root>/apps/shell.
Contiki shell is very useful. Let’s build and deploy a Contiki application onto a Contiki mote. Then, we want to analyze what is happening inside the Contiki mote. To do this, we can build a custom Contiki shell related to our needs. We call the shell from the Contiki-NG mote and perform our analysis.
One important thing that we should know is the limitations on Contiki mote storage and resources. Building more Contiki shell API means using more mote resources. Make sure our Contiki shell is optimal for our Contiki mote model.
For this simple demo, we will use a Contiki sample from the Contiki source code. We can see it at <Contiki-root>examples/example-shell. This program runs for native platforms such as a computer.
In this demo, the function PROCESS_ THREAD(example_shell_process, ev, data) can be seen as follow:
1 | PROCESS_THREAD(example_shell_process, ev, data) |
Each shell API is defined as shell_xxx(). Remarked codes are not supported for native platforms such as a computer.
Now we can compile and run this program. Open Terminal and navigate to the <Contiki-root>examples/example-shell folder. Then, type these commands:
1 | make TARGET=native |
For this demo, we call one of the Contiki shells. To get a list of Contiki shells, we can call the help shell command:
1 | Contiki > help |
By the aforementioned command, we should get a list of supported shells in the console. Then, we execute echo shell command.
We have run a Contiki shell on the computer as a native application. Now, we will build a Contiki shell for a Contiki mote. For demo purposes, I will use TelosB hardware that’s type is Sky. We could use a sample program from the Contiki source code. We can find shell-sky at <Contiki-root>examples/shell-sky folder.
In the sky-shell.c file, the PROCESS_THREAD(sky_shell_process, ev, data) code is shown as follows:
1 | PROCESS_THREAD(sky_shell_process, ev, data) |
Notice: We only use some essential shells due to the Contiki mote’s resource limitation.
Other shell API are remarked as comments. Now, compile and upload this program into Contiki mote. For instance, I use the Contiki-NG mote–based Sky. Open Terminal and navigate to the <Contiki-root>examples/shell-sky folder. We can type these commands to compile and upload the program to the Contiki-NG mote with sky as target:
1 | make TARGET=sky |
After it has completed, we can monitor our Contiki mote. We can type this command:
1 | make login |
Then, reset our Contiki mote in order to use the Contiki shell. If it succeeds, we should see the Contiki shell terminal as follows:
1 | ./example-shell.native |
From the Contiki shell, we can test it using the commands help and echo. We can type these commands:
1 | Contiki> help |
If we want to exit from the Contiki shell, we can type exit. If we get problems quitting from the Contiki shell, we can press CTRL+C to enforce the exit.
Customizing Contiki Shell
In some cases we may need to customize the Contiki shell to fit our problems. The thing that we should be aware of is our space and resource usage while implementing a Contiki shell.
In the previous section, we learned how to access Contiki and Contiki shells. Now, we will build our own Contiki shell API. For this simple demo, we will develop a Contiki shell with an addition math operation. This API will receive two number parameters. These number parameters will be added and then sent back as the Contiki shell output.
To build our own Contiki shell, we can add our shell objects to the <Contiki-root>/apps/shell folder. For our scenario, we add two files, shell-math.c and shell-math.h.
There are two steps to building a custom Contiki shell.
First, we create an object file (
*.c) in which to declare all Contiki shell implementations. We declare the Contiki shell API usingSHELL_COMMAND().Then, we implement the shell API on a process by declaring it in
PROCESS().Last, we register and initialize our Contiki shell API by calling the
shell_register_command()function. This function will be called on theshell_math_init()function. The Contiki program that will use this shell should callshell_math_init()function to access the shell API.
For implementation, we start to write the program in the shell-math.c file. We receive two number input parameters. Then, we perform the addition operation. The following is the complete program for the shell- math.c file:
1 |
|
Input data from the user can be obtained from the data variables in the function parameters. We parse the data into two number variables.
Next, we write a header file, called shell-math.h, for our Contiki shell API. We only declare our function, shell_math_init(). The following is the complete program for the shell-math.h file:
1 |
|
Save all the files. Now, we should configure Makefile to include these files in compilation. We can open Makefile.shell in the same folder with the shell API files. Open this file and add our shell files. We can see them in the codes here:
1 | ... |
Our Contiki shell API is now ready for compiling. The next step is to develop a Contiki application to use our Contiki shell API, math shell. We create a folder, called shell-math-demo. Then, we create two files:
shell-math-demo.cThe shell-math-demo.c file consists of a program to use the Contiki math shell API. The following is the complete program in the
shell-math-demo.cfile:1
2
3
4
5
6
7
8
9
10
11
12
13
14
15
16
17
18
19
20
21
22
23
24
25
26
27
28
29
30
31
32
33
34
35
36
37
38
/*-----------------------------------------------------------*/
PROCESS(sky_shell_process, "Sky Contiki shell");
AUTOSTART_PROCESSES(&sky_shell_process);
/*-----------------------------------------------------------*/
static struct ctimer debug_timer;
static void
periodic_debug(void *ptr)
{
ctimer_set(&debug_timer, 20 * CLOCK_SECOND, periodic_debug, NULL);
collect_print_stats();
}
/*-----------------------------------------------------------*/
PROCESS_THREAD(sky_shell_process, ev, data)
{
PROCESS_BEGIN();
ctimer_set(&debug_timer, 20 * CLOCK_SECOND, periodic_debug, NULL);
serial_shell_init();
shell_blink_init();
shell_reboot_init();
shell_sky_init();
shell_power_init();
shell_powertrace_init();
shell_text_init();
shell_time_init();
shell_collect_view_init();
shell_math_init();
PROCESS_END();
}
/*-----------------------------------------------------------*/MakefileFurthermore, we write scripts in the
Makefile. We include Contiki and the project path. We write these complete scripts as follows:1
2
3
4
5
6CONTIKI_PROJECT = shell-math-demo
all: $(CONTIKI_PROJECT)
APPS = serial-shell powertrace collect-view
CONTIKI = ../..
CONTIKI_WITH_RIME = 1
include $(CONTIKI)/Makefile.includeCONTIKI_WITH_RIME = 1is used to enable the RIME protocol since Contiki shell uses it on some shell commands. We also supply a testing configuration by including thisMakefile,/home/user/nes/testbed-scripts/Makefile.include, because some shell commands need it.
Save all files.
Now, we compile our program, shell-math-demo. Open Terminal and navigate to the shell-math-demo folder. Type these commands:
1 | make TARGET=sky |
After our program is uploaded to Contiki mote, we can monitor the mote. We can type this command:
1 | make login |
If it succeeds, we should see the Contiki shell. Now, we can call our Contiki shell API. We can type this command in the Contiki shell:
1 | Contiki> math 10 5 |
This shell will call our Contiki shell API. Value inputs $10$ and $5$ will be executed to perform the addition operation.
Custom Contiki-NG Shell
Contiki-NG applies shell with a different approach. To customize a shell, we can add our shell command to the shell-commands.c file. We can find that file in the <contiki-ng-root>/os/services/shell folder.
We add a new shell command to the shell-commands.c file. We define a “hello” command. We print the message “Hi, this is a custom shell” to Terminal. Write this code:
1 | static PT_THREAD(cmd_hello(struct pt *pt, shell_output_func output, char *args)) |
Next, we also register our shell in the shell_command_t shell_commands struct. We define the shell name, method call, and description. For instance, we can see the code for our custom NG-shell here:
1 | struct shell_command_t shell_commands[] = { |
Save all files.
Now, we can use the NG shell on our project. For instance, we can use a hello-world project and enable the Contiki-NG shell. We only enable shell service on Makefile:
1 | MODULES += os/services/shell |
After that, we compile and flash this program onto the Contiki-NG mote. We can now remote into the Contiki mote Terminal using mote login. For instance, I remote access my TI LaunchPad CC2650 using this command:
1 | make login TARGET=srf06-cc26xx PORT=/dev/ttyUSB0 |
We should change TARGET and PORT to reflect our Contiki board. Please press the Reset button on the Contiki mote if you do not see anything in Terminal. Now, you can test your own shell:
1 | shell> help |
Leo
烟雨化桥常相念,塞上门楼空许约。